Lesson Objective
By the end of this lesson, you should be able to:
- Explain Analogue to Digital Conversion - Describe how sound is sampled and digitised.
- Understand Sampling Parameters - Define sample rate (Hz) and bit depth (resolution).
- Describe Quality Factors - Explain how sample rate and bit depth affect audio quality and file size.
- Calculate Audio File Size - Use the formula to calculate the size of a digital audio file.
- Encode Sound in Binary - Convert sample amplitude values into binary numbers.
Student Login
Access exclusive lesson resources, notes, and materials.
Analogue to Digital Conversion
Sound in the real world is analogue—a continuous wave of changes in air pressure. To store and process it on a computer, we must convert it into digital (discrete binary) form.
The Process of Digitising Sound
- Microphone: Translates air pressure waves into a continuous, fluctuating electrical voltage (analogue signal).
- Analogue-to-Digital Converter (ADC): This is the crucial step. The ADC:
- Samples the signal at regular intervals (Sample Rate).
- Measures the amplitude (strength) of the signal at each point (Resolution/Bit Depth).
- Outputs a stream of binary numbers representing these measurements.
This process is known as sampling. The quality of the digital sound depends on two key parameters: Sample Rate and Bit Depth (Resolution).
Sound Resolution (Bit Depth)
Resolution or bit depth refers to the number of bits used to represent the amplitude (loudness/height) of the sound wave at each sample point. It is measured on the Y-axis of a sound graph.
A higher bit depth allows for more precise measurement of the amplitude, resulting in a more accurate digital copy of the original wave and a cleaner sound with less background noise (called "quantisation noise").
Visualising Bit Depth: Low vs. High Resolution
The green blocks represent the digital value recorded for each sample. Notice how higher resolution (more bits) creates a "stepped" wave that more closely follows the smooth, original analogue wave (in grey).
Low Resolution (e.g. 3-bit)
Fewer possible amplitude values. The digital copy is less accurate.
3-bit Depth: 23 = 8 possible amplitude levels (0-7).
Higher Resolution (e.g. 4-bit or more)
More possible amplitude values. The digital copy is more accurate.
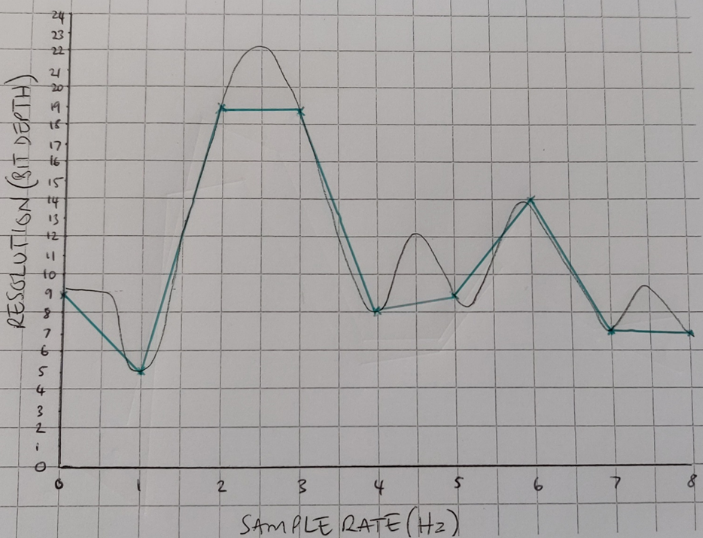
Higher Bit Depth: e.g., 4-bit = 16 levels (0-15), 16-bit = 65,536 levels!
Key Point: Increasing bit depth on its own improves amplitude accuracy, but to capture the shape of the wave accurately, you must also increase the sample rate.
Advertisement.
Sample Rate
The sample rate is the number of samples (measurements) taken per second. It is measured in Hertz (Hz) and represented on the X-axis (time) of a sound graph.
Units of Sample Rate
- 1,000 Hz = 1 kilohertz (1 kHz)
- 1,000 kHz = 1 megahertz (1 MHz) - used in radio, not typical audio.
- Common audio sample rates: 44.1 kHz (CD quality), 48 kHz (DVD/film), 96 kHz (high-resolution audio).
Visualising Sample Rate: Low vs. High
A higher sample rate takes measurements more frequently, allowing the digital version to capture more detail about how the wave changes over time.
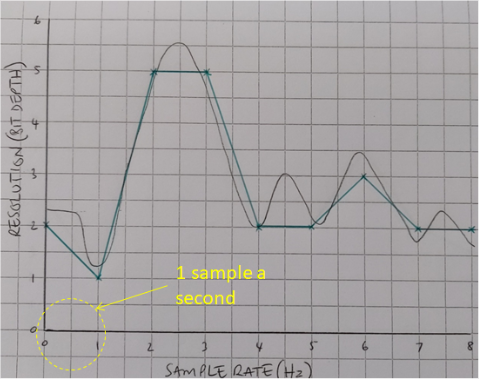
Low Sample Rate (e.g. 2 samples/sec)
Few samples miss details of the wave's shape.
With only 2 samples per second over 4 seconds, the digital reconstruction (connecting the green dots) would be a poor representation of the original wave.
Higher Sample Rate (e.g. 4 samples/sec)
More samples capture the wave's shape more faithfully.
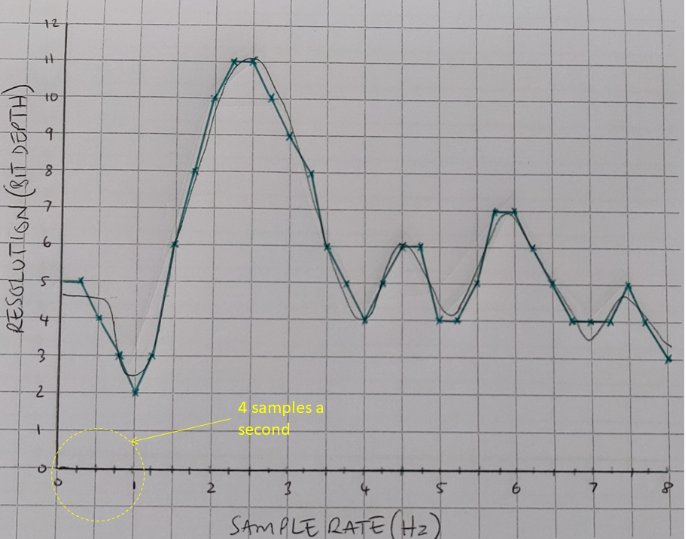
With 4 samples per second, the digital points (green dots) more closely follow the original wave, leading to much higher quality audio when reconstructed.
The Golden Rule: For high-quality digital audio, you need both a high sample rate (to capture frequency/change over time) and a high bit depth (to capture amplitude/loudness accurately).
Representing Sound as Binary
Each sample taken by the ADC is a measurement of amplitude. This measurement, a number, must be stored as a binary value. The number of bits used for this is the bit depth.
Determining the Required Bit Depth
The bit depth must be sufficient to represent the highest possible amplitude value (the maximum on the Y-axis). If your resolution scale goes from 0 to 31, you need enough bits to represent the number 31.
- What is the highest number? 31
- What is 31 in binary? 11111
- How many bits is that? 5 bits
Therefore, you need a 5-bit depth for this audio.
Example: Storing Samples as Binary
Imagine a short audio clip sampled 6 times, with amplitudes measured on our 0-31 scale. Each amplitude value is converted into a 5-bit binary number.
| Time Sample | 1 | 2 | 3 | 4 | 5 | 6 |
|---|---|---|---|---|---|---|
| Resolution (Amplitude) | 10 | 17 | 5 | 20 | 7 | 31 |
| Binary (5-bit) | 01010 | 10001 | 00101 | 10100 | 00111 | 11111 |
This stream of binary numbers—01010 10001 00101 10100 00111 11111—is the core digital data representing the sound.
Advertisement.
Calculating Audio File Size
You can calculate the size of an uncompressed digital audio file using a simple formula based on the sampling parameters.
The Formula
File Size (bits) = Sample Rate × Bit Depth × Length (in seconds)
Step-by-Step Example
Scenario: Calculate the file size for 8 seconds of mono audio, sampled at 1 Hz (1 sample per second) with a 5-bit depth.
- Identify the values:
- Sample Rate = 1 sample/sec
- Bit Depth = 5 bits/sample
- Length = 8 seconds
- Apply the formula (in bits):
1 × 5 × 8 = 40 bits - Convert to bytes (Optional):
40 bits ÷ 8 = 5 bytes
A Real-World Example
Scenario: Calculate the size of 1 minute (60 seconds) of CD-quality stereo audio. CD quality is 44,100 Hz sample rate, 16-bit depth.
- For one channel (Mono):
44,100 × 16 × 60 = 42,336,000 bits per channel. - For two channels (Stereo):
42,336,000 bits × 2 = 84,672,000 bits. - Convert to Megabytes (MB):
- 84,672,000 bits ÷ 8 = 10,584,000 bytes.
- 10,584,000 bytes ÷ 1,024 ≈ 10,336 Kilobytes (KB).
- 10,336 KB ÷ 1,024 ≈ 10.09 Megabytes (MB).
This is why we use compressed formats like MP3 and AAC—to make these large files manageable for storage and streaming!
Lesson Summary
- Analogue to Digital: Sound is digitised by sampling (taking regular measurements) and quantisation (measuring amplitude).
- Bit Depth (Resolution): The number of bits per sample. Determines the precision of amplitude measurement (Y-axis). Higher = more accurate loudness/less noise.
- Sample Rate: The number of samples taken per second, in Hz (X-axis). Higher = can capture higher frequencies and wave shape more accurately.
- Quality vs. File Size: Increasing either bit depth or sample rate improves quality but increases file size.
- Binary Representation: Each sample's amplitude is stored as a binary number. The required bit depth depends on the maximum amplitude value.
- File Size Formula: File Size (bits) = Sample Rate × Bit Depth × Seconds. For stereo, multiply the result by 2.
- Real-World Context: CD Audio = 44.1 kHz, 16-bit. High bit depth and sample rates create large files, necessitating compression for everyday use.